Even wanted to impress your friends and family with a classic of Italian cuisine? Despite the fancy variations you can find in restaurants, risotto is a dish that is actually very simple to make at home. Risotto’s delightful creamy texture comes from slowly adding water or broth and releasing the starch from the rice, not from the addition of tons of heavy cream! Risotto recipes are very versatile and offer countless possibilities and additions, but if you master the basics, the sky is the limit. So, if you’re looking to make a perfect creamy risotto at home, here’s the easiest cooking method!


Key ingredients for making risotto
- Arborio rice: Arborio is a round short-grain rice that releases starch for a creamy texture. I think this is the best rice for making risotto. The thick center of the grain stays al dente while the edges melt into divine creaminess! You can also use sushi rice. Avoid long-grain rice, jasmine rice, or basmati… They’re too thin and won’t bring this creamy texture you’re looking for.
- White onion: White onion provides a sweet, aromatic base for the risotto, without being too overwhelming like yellow onion.
- Dry white wine: I like adding a dash of wine to all of my risottos. It adds a bit of acidity and complexity to the flavors. You don’t need to break the bank for that, a simple sauvignon blanc will do the trick.
- Butter: I prefer unsalted butter. If using salted butter, take it into account when seasoning with salt. Butter is stirred in at the end of cooking the risotto for richness and smoothness.
- Parmesan: Adds a savory touch and helps thicken the risotto to a luscious finish. I’m not fond of the powdery, prepackaged grated Parmesan. Use the real thing instead, and grate the block of cheese as you go!


How to make creamy risotto
This is our basic method for making a perfect creamy risotto every time. Depending on the recipe you’ll use later, you can tweak it and make additions. Here are the basic principles:
- Prepare the cooking water: Simmer salted water in a separate pot to use throughout the cooking process.
- Sauté the onion: Cook finely chopped white onion in olive oil and butter until very soft and fragrant.
- Toast the rice: Stir in rice and cook until the grains turn translucent… and a little bit more.
- Deglaze with wine: Add white wine (optional) and let it evaporate completely.
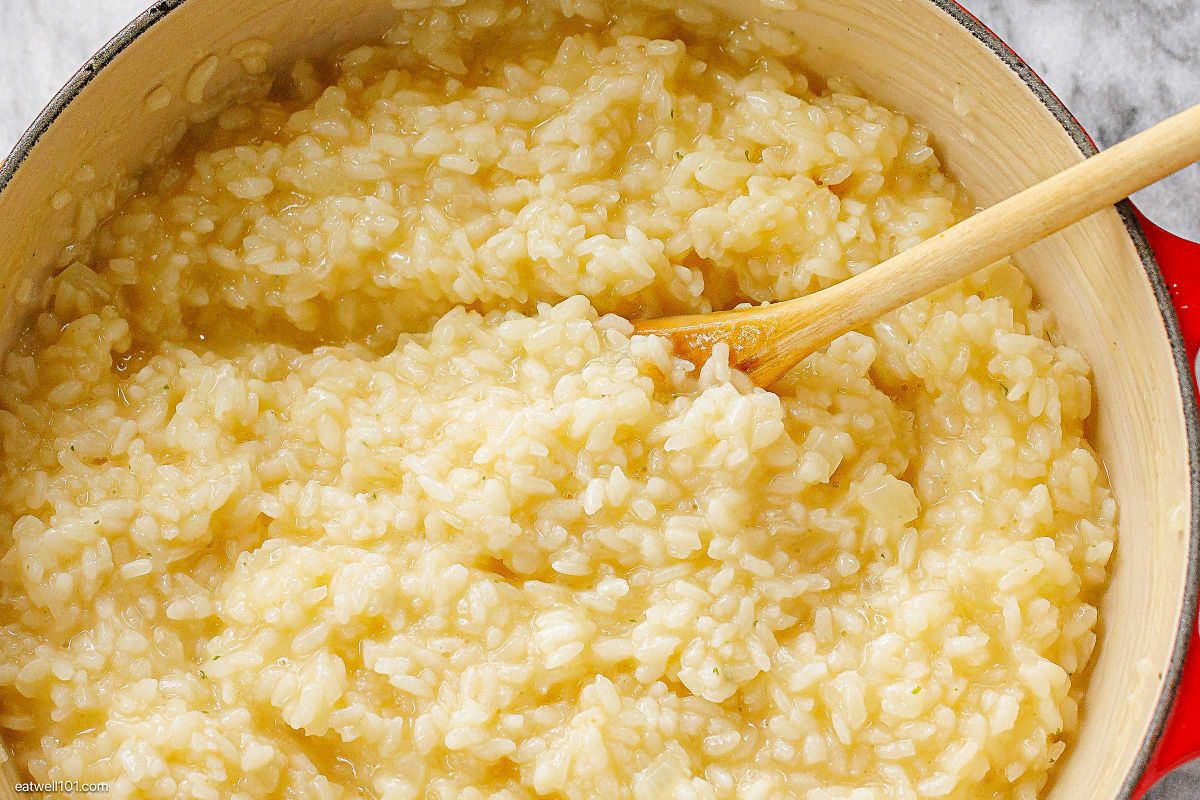
- Add salted water gradually: Stir in hot salted water ½ cup at a time, letting it absorb before adding more. Continue until rice is al dente and creamy, about 15–20 minutes.
- Finish with butter and cheese: Stir in butter and Parmesan off heat until smooth and silky. Adjust the texture with more broth if needed and season to taste.

What to serve with risotto?
While risotto is traditionally considered a main course, you can top it with a protein or serve it as a side dish.
Risotto pairs well with seafood: Try these grilled shrimps or blackened salmon.
These honey garlic chicken bites will make a perfect topping, and if you are on the vegetarian side, try our Garlic Mushrooms with Sun-Dried Tomatoes or our Sauteed Garlic Butter Mushrooms Skillet.

Pro-tips
- The key to making risotto is patience! You need to stay around and keep stirring and adding liquid to the rice.
- When you master this method, feel free to experiment: use vegetable or chicken broth instead of salted water, add a touch of heavy cream along with butter, add chopped aromatics when sauteeing the rice, etc…

More risotto recipes you might like
Here are a couple of recipes that use this basic cooking method:
…And some risotto variations with bulgur or quinoa:


Creamy Risotto Recipe
Master this simple, creamy risotto technique and impress with a restaurant-worthy dish—no cream required!
- 1 cup rice (arborio or sushi rice)
- 3 tablespoons extra-virgin olive oil, divided
- Kosher salt and fresh cracked black pepper (to taste)
- 1/2 white onion, finely chopped
- 1/2 cup dry white wine, optional
- 5 cups warm salted water
- 2 tablespoons unsalted butter, cut into pieces
- 1 cup finely grated Parmesan
Instructions
- Combine 1 tablespoon salt and 5 cups water in a medium stockpot. Bring to a simmer over medium heat.
- Heat 3 tablespoons olive oil and a few cubes of butter in a Dutch oven over medium heat. Cook chopped onion with a pinch of salt until the onion is translucent and starting to soften, 4-6 minutes. Add 1/2 cup of water and cook, stirring regularly, until water evaporates and onion is sizzling in oil and completely soft, about 5 minutes.
- Add rice to the onion and stir well to coat with oil. Stir fry the rice, stirring constantly until grains of rice are translucent, about 5 minutes. Stir for about 1 or 2 minutes to make sure the rice grains are well toasted.
- Add the white wine (if using) and another pinch of salt. Bring to a simmer and cook, stirring occasionally, until wine is completely evaporated, about 2 minutes.
- Reduce the heat to medium, then add the hot salted water to the rice in 1/2-cup increments, stirring constantly and allowing liquid to absorb fully before adding more, until rice is al dente and surrounded by fluid, not-too-thick creamy suspension–count about 15–20 minutes. The rice should be tender but not mushy. Do not overcook.
- Remove risotto from heat, add butter, and stir until melted. Gradually add Parmesan, stirring until cheese is melted. Stir in more hot salted water if needed to achieve the right consistency. Adjust seasoning if necessary.
Recipe Notes
- If you're unsure of how to toast the rice. Remove the onion from the pan and set it aside. Then start afresh with rice. That way you won't risk burning the onion. Add the onion back when adding white wine.
- A Dutch oven is a must for this recipe because it distributes heat evenly so you don't need to heat too much and risk burning things!
Did you make this recipe?
Tag @eatwell101
on Instagram and hashtag it #eatwell101.
This post may contain affiliate links. Please read our disclosure for more info.
People Also Planned
Recipes readers often save or add to their meal plans together.